Networking & Content Delivery
Visitor Prioritization on e-Commerce Websites with CloudFront and Lambda@Edge
What is Visitor Prioritization?
If you’re an online retailer, the annual holiday season, special sales, and new product launches are all events that can drive a rapid increase in your website traffic. You can manage surges in customer traffic by building agile applications with AWS that scale in response to incoming traffic, using features like Auto-scaling and managed services such as Amazon Aurora and Amazon DynamoDB. However, you might have legacy applications that can’t be modified to scale seamlessly to handle a sudden increase in traffic. Or you might have certain situations where you want to specifically control how many users can access your application at a time. For example, perhaps you have a special sale that starts at a specific time, and you’ve designed the experience to limit how many customers can peruse the sale at a time. You might want to create a queue for customers that arrive at your site early, or give your premium users prioritized access.
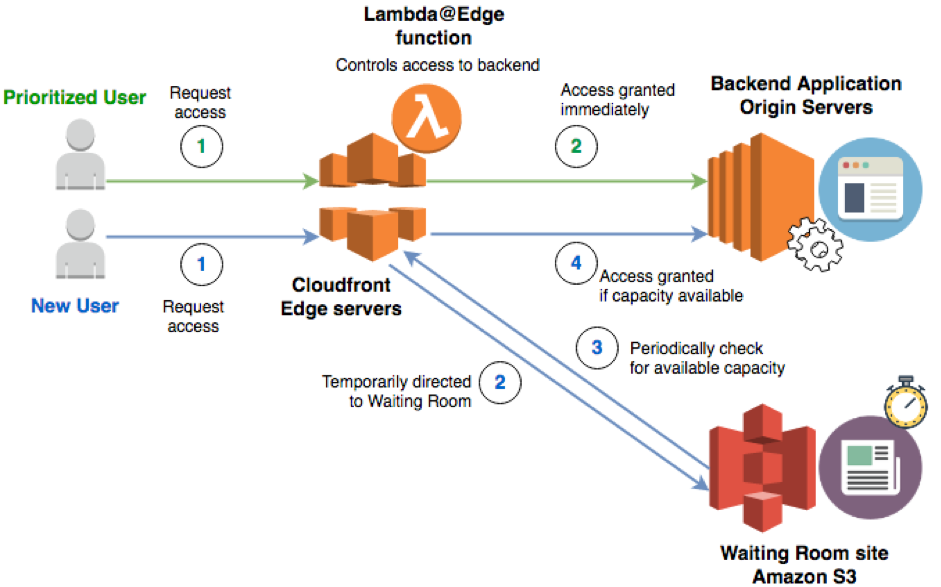
To address these scenarios, you can use Amazon CloudFront and Lambda@Edge to build a Visitor Prioritization workflow that lets you control the proportion of incoming shoppers that are allowed to access your backend application. The remaining shoppers are directed to a temporary “waiting room”— an alternate site with a branded experience where they can wait for a turn to access your main retail website. You can define rules to prioritize access for premium or paid users, and to make sure that shoppers who are purchasing items are given prioritized access until they complete their transaction.
What are CloudFront and Lambda@Edge?
Amazon CloudFront is a content delivery network (CDN) service that securely delivers data, videos, and applications to viewers with low latency and high transfer speeds using a global network of edge locations. CloudFront caches copies of your content, from your own origin servers, in edge servers that are close to your customers.
With Lambda@Edge, you can easily run code in AWS locations globally to customize the content that is returned to your users, based on factors that you specify. To help manage customer traffic, your Lambda function can be configured to run, for example, when a customer requests content from your website—a CloudFront “event” called a viewer request. First, you create a Lambda@Edge function by uploading Node.js code to AWS Lambda (for example, by using the workflow in the AWS console), and then you configure options such as the events when you want the code to run. Lambda@Edge replicates the code to all AWS locations so that it runs regardless of the location worldwide where a customer is accessing your retail site.
In the steps provided later in this blog post, we walk you through how to configure CloudFront and Lambda@Edge to set up Visitor Prioritization with your retail site, including Node.js sample code that you can customize and use.
How does this workflow manage incoming traffic?
This solution uses several configurable options to help you manage large volumes of customers coming to your site:
- A cookie to specify different types of customers: regular and premium
- A value you set to determine the percentage of regular customers that can go to your retail site
- A flag to block all traffic, in case your site is unavailable or not ready to accept traffic yet
The Lambda@Edge function separates your incoming traffic into regular users and premium users by checking for a specific cookie that you set. This lets you provide unrestricted access for paid subscribers or other premium users by setting a cookie in the browser at their request. Premium users have access to your site without going through the probability check, as long as the site is accepting traffic. First-time visitors to your site—new users—don’t have the cookie in their request and are always treated as regular users.
The second way the function helps you control traffic is by determining a percentage of general traffic (regular and new users) that is allowed access to your origin servers, while always allowing pre-approved premium users unrestricted access. You specify the percentage of general traffic that has access by setting an “access control value” between 0 and 1. The following describes how this works in the code:
- A value of 0 means that only premium users can access your website (the CloudFront origin).
- A value of 1 means that you have enough capacity for all traffic to access your website.
- A value between 0 and 1 means that a percentage of customers (excluding pre-approved premium users) can access your site. This works by using the value in a probability function that determines whether a specific request from a viewer is allowed to go to your retail site, or is instead directed to a “waiting room” page.
You set the access control value that you want and change it as often as you like, to adjust for customer traffic and your site’s available capacity. You can either set it manually, or automate it by connecting your Lambda function to other AWS services. For example, you could define your access control value based on Amazon CloudWatch metrics for your backend servers or read a value stored in an Amazon DynamoDB table.
You can also set a separate flag to block all traffic to the origin, in situations when your backend site can’t accept any requests for a period of time. This can also be used to hold off shoppers from entering your site until a specific time if you have a scheduled launch of a new product or a sale event.
To help explain how the access control value works, consider the following example. Say that you want to allow 80% of regular and new customers to have access to your website, while sending the remaining 20% of these users to waiting room page until you decide that the backend servers can handle the additional requests. You set the access control value to 0.80. In the code, a probability function generates a value between 0 and 1 for every incoming request to visit your website. For a specific request, let’s say that the value returned by the probability function is, for example, 0.65. This request is allowed to proceed to your site, because the value is less than the control value of 0.80. If instead the probability function returns, for example, 0.91, then the request is forwarded to the waiting room page. Since the probability values are provided by a pseudorandom number generator, over a large number of customer requests, the results returned will be reasonably uniformly distributed between 0 and 1.
When you create your waiting room, make sure that it’s a scalable website that doesn’t have dependencies on databases and other difficult-to-scale components. You can, for example, host on Amazon S3 a static website with your branding, and include advertisements, games, or catalogs for shoppers to browse while they wait for a turn to access the main retail website. Since Amazon S3 is a massively scalable managed service, it automatically handles a heavy load of incoming traffic.
Setting up Visitor Prioritization for your site
To begin using Visitor Prioritization for your site, do the following:
Step 1: Create and customize your waiting room page.
Step 2: Customize the function code for your site.
Step 3: Create and configure the CloudFront distribution.
Step 4: Create and configure the Lambda@Edge code to implement the solution.
After you complete these steps, you’ll test the solution to make sure that it works correctly for your site.
Step 1: Create a custom waiting room page
Create a branded waiting room page for your customers, for example, by adding content to an S3 bucket and setting it to host a static website.
Note: In the function code, the contents folder path for the waiting room is /waitingroom and the waiting room landing page is please-try-again.html. Make sure that you upload content to this location before you continue with these steps. You can change folder path and landing page values if you like. But since the waiting room URL is never shown in the viewer’s browser, there’s typically no need to update the default naming convention.
Step 2: Customize the function code
- The Flash Crowd Traffic Management Lambda@Edge function is provided as the following Javascript code:
'use strict'; /* * A flag indicating whether the origin is ready to accept traffic. It's * a static value for this example, but you could instead read the value * from an S3 bucket with restricted access, a DynamoDB table, * or the CloudFront cache. */ const originAcceptingTraffic = true; /* * The origin hit rate (a value between 0 and 1) specifies a percentage of * users that go directly to the origin, while the rest go to * a "waiting room." Premium users always go to the origin. If you want * to adjust traffic dynamically, you can store and retrieve the origin * hit rate value from an S3 bucket, a DynamoDB table, or the CloudFront * cache. */ const originHitRate = 0.3; exports.handler = (event, context, callback) => { const request = event.Records[0].cf.request; if (!shouldGoToOrigin(request)) { setupWaitingRoom(request); } callback(null, request); }; function shouldGoToOrigin(request) { if (!originAcceptingTraffic) { console.log("Origin is not accepting any traffic. " + "All requests go to the waiting room."); return false; } if (isPremiumUser(request.headers.cookie)) { console.log("A premium user goes to the origin."); return true; } if (Math.random() <= originHitRate) { console.log("A lucky user goes to the origin."); return true; } console.log("An unlucky user goes to the waiting room."); return false; } function isPremiumUser(cookies) { /* * You can replace the static cookie value here with * your own custom authentication logic. */ const premiumUserCookieName = 'premium-user-cookie'; const premiumUserCookieValue = 'some-secret-cookie-value'; const parsedCookies = parseCookies(cookies); if (parsedCookies[premiumUserCookieName] && parsedCookies[premiumUserCookieName] === premiumUserCookieValue) { console.log(`Cookie "${premiumUserCookieName}" has ` + `a valid secret value of "${premiumUserCookieValue}".`); return true; } return false; } function setupWaitingRoom(request) { const waitingRoomS3 = 'your-waiting-room-bucket.s3.amazonaws.com'; request.origin = { s3: { domainName: waitingRoomS3, region: '', authMethod: 'none', path: '/waitingroom', customHeaders: {} } }; request.headers['host'] = [{ key: 'host', value: waitingRoomS3 }]; request.uri = '/please-try-again.html'; } function parseCookies(cookies) { cookies = cookies || []; let parsed = {}; for (let hdr of cookies) { for (let cookie of hdr.value.split(';')) { const kv = cookie.split('='); if (kv[0] && kv[1]) { parsed[kv[0].trim()] = kv[1].trim(); } } } return parsed; } - Open the file in a text editor, and then update the following fields in the code to meet your requirements:
- originAcceptingTraffic – The default is true. Set this to false if your origin is not ready to accept traffic.
- originHitRate – A number between 0 and 1. This value indicates the percentage of incoming new and regular customer requests that are allowed to go to your retail website.
- waitingRoomS3 – The complete URL of the S3 bucket that hosts your content for the waiting room page.
As a best practice, you should start by setting originHitRate to 1 when you deploy this solution to a live site, to avoid any unexpected throttling of current customer traffic.
Step 3: Create a CloudFront distribution
You can work with an existing CloudFront distribution if you already have one, or create a new CloudFront web distribution.
- Add a new behavior in your distribution to specify the URL path where the Visitor Prioritization logic in your code should be applied. This is typically your website’s landing page or the page where your customers start their shopping process. You should exclude the static assets required to render your website, such as images, JavaScript, CSS, and so on by making sure those files are in a different folder that isn’t in this URL path.
- Choose the following settings for the behavior-
- For Object Caching, choose Customize, and then set the Default TTL, Minimum TTL and Maximum TTL all to 0.Alternatively, if your website uses origin cache-control headers, you can choose Use Origin Cache Headers, and include a Cache-control: no-cache, no-store header to achieve the same result.These settings make sure that the page that you specify for your Visitor Prioritization logic is not cached by CloudFront, so that the Visitor Prioritization rules are evaluated independently for every incoming customer request.

- For Forward Cookies, choose Whitelist. Then, for Whitelist Cookies, enter the name of the cookie that you use to identify pre-approved premium users, for example, premium-user-cookie.

- For Object Caching, choose Customize, and then set the Default TTL, Minimum TTL and Maximum TTL all to 0.Alternatively, if your website uses origin cache-control headers, you can choose Use Origin Cache Headers, and include a Cache-control: no-cache, no-store header to achieve the same result.These settings make sure that the page that you specify for your Visitor Prioritization logic is not cached by CloudFront, so that the Visitor Prioritization rules are evaluated independently for every incoming customer request.
You can keep all of the remaining settings at their default values, or modify them for other business needs. Leave the Lambda Function Associations section empty.
Step 4: Create and configure the Lambda@Edge function
- In the Lambda console, create a new Lambda@Edge function and then copy into the Lambda function the flashCrowdTrafficManagement.js code that you downloaded and edited in Step 2.
- Publish the Lambda@Edge function to create the first version by selecting Actions > Publish new version.
- Add a trigger for your function that will make the function run for a specific CloudFront event: when a user makes a request to your website from their browser, and Cloudfront forwards that request to your origin.
- Under Add Triggers, select CloudFront.
- Choose your CloudFront distribution and the cache behavior that you created in Step 2.
- In the CloudFront Event drop-down list, select Origin Request.
- Select Enable trigger and replicate.
- Choose Add, and then choose Save.
4. Wait for the function to be deployed completely in CloudFront. This typically takes 10 to 15 minutes.
You can check to see if replication is complete by going to the CloudFront console and viewing your distribution. Check for the distribution status to change from In Progress back to Deployed.
Now your Visitor Prioritization function is associated with the behavior that you configured for your CloudFront distribution, and the updates have been replicated to AWS locations globally.

Testing Visitor Prioritization
After you set up the Lambda function and the CloudFront distribution is deployed, you can try out the function to see if it’s working. You do this by simulating different use cases with Visitor Prioritization by changing the originHitRate in your Lambda function and adding the specific cookie that gives premium users access to your site.
Important: Whenever you change the originHitRate value in the Lambda function, you must save and publish a new version of the function, and then associate the new version of the function with your CloudFront distribution, as explained in Step 4 in the previous section. This is required to apply the changes and replicate the updated value across all CloudFront locations.
Do NOT test your function with a live production site. Setting a value less than 1 will start throttling some of your existing customer traffic immediately.
Test case 1: Normal operation, no traffic diverted to waiting room
Set the originHitRate in your Lambda function to 1. Now make a request from a browser or command line to visit your website by entering the URL. The request should return the same response as before you set up Visitor Prioritization.
Test case 2: Only premium users allowed to access site
Change the originHitRate value in your Lambda function to 0. Make a request from a browser or command line to visit your website by entering the URL. You should see the waiting room page that you defined in your Lambda@Edge function.
Now, repeat the same request, but this time include the specific premium user cookie that you defined in your function.
- If you are testing from a browser, there are Firefox and Chrome plugins available that let you add request headers, including a ‘Cookie’ header.
- If you are testing from the command line, you can use curl -b or –cookie to specify your request cookie.
The request should return the same response as before you set up Visitor Prioritization.
Test case 3: Visitor Prioritization in progress, new user
Change the originHitRate value in your Lambda function to a number between 0.01 and 0.99. Now make a request from a browser or command line to visit your site by entering the URL. You should receive either a 200 OK response from your origin server or see the waiting room page. Repeat the request several times and make sure you get both type of responses.
Note that because access is determined by a probability function, you might not get identical response patterns if you do multiple tests. This is expected behavior.
Test case 4: Visitor Prioritization in progress, premium user
Use an OriginHitRate value between 0.01 and 0.99, and make a request from a browser or command line to visit your website by entering the URL, with the premium user cookie set. You should receive a 200 OK response from your origin server.
Test case 5: Site (origin) not accepting any traffic
Set the originAcceptingTraffic flag in the Lambda@Edge code to false and make a request to your website’s URL. All requests, with or without the premium user cookie, should show the waiting room page.
If you like, test additional use cases by changing the originHitRate and the cookie in your requests.
Additional Customization Options
The sample code provided here is simply a Lambda function written in node.js, so if you’re feeling creative, you can add more features to improve your Visitor Prioritization. For example, you could do the following:
- Extend the concept of new and premium users to allow continued access for returning users who may have been granted access once. This can be done by assigning a different cookie to new users who were granted access to the origin, and modifying the code to evaluate this cookie too, similar to evaluating cookie for premium user access.
- Define a custom TTL on the cookies to decide how long an approved user is allowed access the site, to help prevent misuse. You can then modify the Lambda@Edge function to check if a user request has an expired TTL, and if so, treat them as a new user.
- For users who do not get access and are directed to the waiting room, assign a specific cookie with a TTL and a configurable time to wait before trying again to access your retail site. You could also define a maximum time in the waiting room after which users are treated as premium users and granted access, as long as there is available capacity.
These are just a few examples of how you could improve the functionality and flexibility of this solution. There are unlimited possibilities with Lambda@Edge!
Conclusion
Lambda@Edge with Amazon CloudFront gives you the flexibility to build customized solutions to gain control over your business-critical applications and maintain a positive user experience for your website visitors. With Visitor Prioritization, your website can handle sudden traffic spikes without provisioning new infrastructure, to help reduce shopping cart abandonment and potential lost revenue.
| Blog: Using AWS Client VPN to securely access AWS and on-premises resources | ||
| Learn about AWS VPN services | ||
 |
Watch re:Invent 2019: Connectivity to AWS and hybrid AWS network architectures |