


PIMO is a tool for data masking. It can mask data from a JSONline stream and return another JSONline stream thanks to a masking configuration contained in a yaml file.

You can use LINO to extract sample data from a database, which you can then use as input data for PIMO's data masking. You can also generate data with a simple yaml configuration file.
Capabilities
- credibility : generated data is not distinguishable from real data
- data synthesis : generate data from nothing
- data masking, including
- randomization : protect personal or sensitive data by writing over it
- pseudonymization, on 3 levels
- consistent pseudonymisation : real value A is always replaced by pseudo-value X but X can be attributed to other values than A
- identifiant pseudonymisation : real value A is always replaced by pseudo-value X and X CANNOT be attributed to other values than A
- reversible pseudonymisation : real value A can be generated from pseudo-value X
PIMO requires a yaml configuration file to works. By default, the file is named masking.yml and is placed in the working directory. The file must respect the following format :
version: "1"
seed: 42
functions:
    # Optional define functions
masking:
  - selector:
      jsonpath: "example.example"
    mask:
      type: "argument"
    # Optional cache (coherence preservation)
    cache: "cacheName"
    # Optional custom seed for this mask
    seed:
      field: "example.example"

  # another mask on a different location
  - selector:
      jsonpath: "example.example2"
    mask:
      type: "argument"
    preserve: "null"

caches:
  cacheName:
    # Optional bijective cache (enable re-identification if the cache is dumped on disk)
    unique: true
    # Use reverse cache dictionnary
    reverse: true
version is the version of the masking file.
seed is to give every random mask the same seed, it is optional and if it is not defined, the seed is derived from the current time to increase randomness.
functions is used to define the functions that can be used in the te mask template, template-each, add, and add-transient.
masking is used to define the pipeline of masks that is going to be applied.
selector is made of a jsonpath and a mask.
jsonpath defines the path of the entry that has to be masked in the json file.
mask defines the mask that will be used for the entry defined by selector.
cache is optional, if the current entry is already in the cache as key the associated value is returned without executing the mask. Otherwise the mask is executed and a new entry is added in the cache with the orignal content as key and the masked result as value. The cache have to be declared in the caches section of the YAML file.
preserve is optional, and is used to keep some values unmasked in the json file. Allowed preserve options are: "null" (null values), "empty" (empty string ""), and "blank" (both empty and null values). Additionally, preserve can be used with mask fromCache to preserve uncached values. (usage: preserve: "notInCache")
Multiple masks can be applied on the same jsonpath location, like in this example :
  - selector:
      jsonpath: "example"
    masks:
      - add: "hello"
      - template: "{{.example}} World!"
      - remove: true
Masks can be applied on multiple selectors, like in this example:
  - selectors:
      - jsonpath: "example"
      - jsonpath: "example2"
    mask:
      add: "hello"
It is possible to define functions and reuse them later in the masks, like in this example:
functions:
  add20:
    params:
      - name: "i"
    body: |-
      return i + 20
  sub:
    params:
      - name: "x"
      - name: "y"
    body: |-
      return x - y
masking:
  - selector:
      jsonpath: "addValue"
    mask:
      template: '{{add20 5}}'
  - selector:
      jsonpath: "subValue"
    mask:
template: '{{sub 10 5}}'The following types of masks can be used :
- Pure randomization masks
regexis to mask using a regular expression given in argument.randomIntis to mask with a random int from a range with arguments min and max.randomDecimalis to mask with a random decimal from a range with arguments min, max and precision.randDateis to mask a date with a random date betweendateMinanddateMax.randomDurationis to mask a date by adding or removing a random time betweenMinandMax.randomChoiceis to mask with a random value from a list in argument.weightedChoiceis to mask with a random value from a list with probability, both given with the argumentschoiceandweight.randomChoiceInUriis to mask with a random value from an external resource.randomChoiceInCSVis to mask with a random value from an external CSV resource.transcodeis to mask a value randomly with character class preservation.timelineto generate a set of dates related to each other (by rules and constraints)
- K-Anonymization
- Re-identification and coherence preservation
hashis to mask with a value from a list by matching the original value, allowing to mask a value the same way every time.hashInUriis to mask with a value from an external resource, by matching the original value, allowing to mask a value the same way every time.hashInCSVis to mask with a value from an external CSV resource, by matching the original value, allowing to mask a value the same way every time.fromCacheis a mask to obtain a value from a cache.ff1mask allows the use of FPE which enable private-key based re-identification.
- Formatting
dateParseris to change a date format.templateis to mask a data with a template using other values from the jsonline.template-eachis like template but will apply on each value of an array.fromjsonis to convert string field values to parsed JSON, e.g. "[1,2,3]" -> [1,2,3].
- Data structure manipulation
removeis to mask a field by completely removing it.addis a mask to add a field to the jsonline.add-transientsame asaddbut the field is not exported in the output jsonline.
- Others
constantis to mask the value by a constant value given in argument.commandis to mask with the output of a console command given in argument.incrementalis to mask data with incremental value starting fromstartwith a step ofincrement.fluxUriis to replace by a sequence of values defined in an external resource.replacementis to mask a data with another data from the jsonline.pipeis a mask to handle complex nested array structures, it can read an array as an object stream and process it with a sub-pipeline.luhncan generate valid numbers using the Luhn algorithm (e.g. french SIRET or SIREN).markovcan generate pseudo text based on a sample text.findInCSVget one or multiple csv lines which matched with Json entry value from CSV files.xmlcan manipulate XML content within JSON values.
A full masking.yml file example, using every kind of mask, is given with the source code.
In case two types of mask are entered with the same selector, the program can't extract the masking configuration and will return an error. The file wrongMasking.yml provided with the source illustrate that error.
To use PIMO to mask a data.json, use in the following way :
./pimo <data.json >maskedData.jsonThis takes the data.json file, masks the data contained inside it and put the result in a maskedData.json file. If data are in a table (for example multiple names), then each field of this table will be masked using the given mask. The following flags can be used:
--repeat=NThis flag will make pimo mask every input N-times (useful for dataset generation).--skip-line-on-errorThis flag will totally skip a line if an error occurs masking a field.--skip-field-on-errorThis flag will return output without a field if an error occurs masking this field.--skip-log-file <filename>Skipped lines will be written to<filename>.--catch-errors <filename>or-e <filename>Equivalent to--skip-line-on-error --skip-log-file <filename>.--empty-inputThis flag will give PIMO a{}input, usable with--repeatflag.--config=filename.ymlThis flag allow to use another file for config than the defaultmasking.yml.--load-cache cacheName=filename.jsonThis flag load an initial cache content from a file (json line format{"key":"a", "value":"b"}).--dump-cache cacheName=filename.jsonThis flag dump final cache content to a file (json line format{"key":"a", "value":"b"}).--verbosity <level>or-v<level>This flag increase verbosity on the stderr output, possible values: none (0), error (1), warn (2), info (3), debug (4), trace (5).--debugThis flag complete the logs with debug information (source file, line number).--log-jsonSet this flag to produce JSON formatted logs (demo9 goes deeper into logging and structured logging)--seed <int>Set this flage to declare seed in command line.--maskDeclare a simple masking definition in command line (minified YAML format:--mask "value={fluxUri: 'pimo://nameFR'}", or--mask "value=[{add: ''},{fluxUri: 'pimo://nameFR'}]"for multiple masks). For advanced use case (e.g. if caches needed)masking.ymlfile definition will be preferred.--repeat-until <condition>This flag will make PIMO keep masking every input until the condition is met. Condition format is using Template. Last output verifies the condition.--repeat-while <condition>This flag will make PIMO keep masking every input while the condition is met. Condition format is using Template.--stats <filename | url>This flag either outputs run statistics to the specified file or send them to specified url (has to start withhttporhttps).--statsTemplate <string>This flag will have PIMO use the value as a template to generate statistics. Please use go templating format to include statistics. To include them you have to specify them as{{ .Stats }}. (i.e.{"software":"PIMO","stats":{{ .Stats }}})
The play command will start a local website, where you will find commented examples and a playground to play with the masking configuration.
$ pimo play
⇨ http server started on [::]:3010
Then go to http://localhost:3010/ in your browser.

This section will give examples for every types of mask.
Please check the demo folder for more advanced examples.
  - selector:
      jsonpath: "phone"
    mask:
      regex: "0[1-7]( ([0-9]){2}){4}"
This example will mask the phone field of the input jsonlines with a random string respecting the regular expression.
  - selector:
      jsonpath: "name"
    mask:
      constant: "Bill"
This example will mask the name field of the input jsonlines with the value of the constant field.
  - selector:
      jsonpath: "name"
    mask:
      randomChoice:
       - "Mickael"
       - "Mathieu"
       - "Marcelle"
This example will mask the name field of the input jsonlines with random values from the randomChoice list.
  - selector:
      jsonpath: "name"
    mask:
      randomChoiceInUri: "file://names.txt"
This example will mask the name field of the input jsonlines with random values from the list contained in the name.txt file. The different URI usable with this selector are : pimo, file and http/https.
A value can be injected in URI with the template syntax. For example, file://name{{.gender}}.txt select a line in name_F.txt if the current jsonline is {gender : "F"}.
version: "1"
masking:
  - selector:
      jsonpath: "pokemon"
    mask:
      randomChoiceInCSV:
        uri: "https://gist.githubusercontent.com/armgilles/194bcff35001e7eb53a2a8b441e8b2c6/raw/92200bc0a673d5ce2110aaad4544ed6c4010f687/pokemon.csv"
        header: true          # optional: csv has a header line, use it to name fields, default: false
        separator: ","        # optional: csv value separator is , (default value)
        comment: "#"          # optional: csv contains comments starting with #, if empty no comment is expected (default)
        fieldsPerRecord: 0    # optional: number of fields per record, if 0 sets it to the number of fields in the first record (default)
                              # if negative, no check is made and records may have a variable number of fields
        trim: true            # optional: trim space in values and headers, default: false
The selected field's data will be masked with random values selected from a CSV file available at the specified URL (a GitHub gist in this case).
Here is a detailed breakdown of the example configuration:
- selector: The jsonpath: "pokemon" line means that this masking configuration is meant to apply to the field named "pokemon" in the JSON data.
- mask: This defines the masking operation to be performed on the "pokemon" field.
- randomChoiceInCSV: The mask will replace the value in the "pokemon" field with a random choice from the CSV file at the specified URL.
- uri: The location of the CSV file to use for replacement values,
fileandhttp/httpsschemes can be used. This parameter can be a template. - header: This optional parameter is set to true, meaning the CSV file contains a header line that names the fields.
- separator: This optional parameter specifies that the CSV values are separated by a comma, which is the default separator in CSV files.
- comment: This optional parameter specifies that the CSV file may contain comments that start with a '#'.
- fieldsPerRecord: This optional parameter is set to 0, meaning the number of fields per record will be set to the number of fields in the first record by default. If negative, no check is made and records may have a variable number of fields.
- trim: This optional parameter is set to true, meaning any spaces in values and headers in the CSV file will be trimmed.
  - selector:
      jsonpath: "age"
    mask:
      randomInt:
        min: 25
        max: 32
This example will mask the age field of the input jsonlines with a random number between min and max included.
  - selector:
      jsonpath: "score"
    mask:
      randomDecimal:
        min: 0
        max: 17.23
        precision: 2
This example will mask the score field of the input jsonlines with a random float between min and max, with the number of decimal chosen in the precision field.
  - selector:
      jsonpath: "name"
    mask:
      command: "echo -n Dorothy"
This example will mask the name field of the input jsonlines with the output of the given command. In this case, Dorothy.
  - selector:
      jsonpath: "surname"
    mask:
      weightedChoice:
        - choice: "Dupont"
          weight: 9
        - choice: "Dupond"
          weight: 1
This example will mask the surname field of the input jsonlines with a random value in the weightedChoice list with a probability proportional at the weight field.
  - selector:
      jsonpath: "town"
    mask:
      hash:
        - "Emerald City"
        - "Ruby City"
        - "Sapphire City"
This example will mask the town field of the input jsonlines with a value from the hash list. The value will be chosen thanks to a hashing of the original value, allowing the output to be always the same in case of identical inputs.
  - selector:
      jsonpath: "name"
    mask:
      hashInUri: "pimo://nameFR"
This example will mask the name field of the input jsonlines with a value from the list nameFR contained in pimo, the same way as for hash mask. The different URI usable with this selector are : pimo, file and http/https.
version: "1"
masking:
  - selector:
      jsonpath: "pokemon"
    mask:
      hashInCSV:
        uri: "https://gist.githubusercontent.com/armgilles/194bcff35001e7eb53a2a8b441e8b2c6/raw/92200bc0a673d5ce2110aaad4544ed6c4010f687/pokemon.csv"
        header: true          # optional: csv has a header line, use it to name fields, default: false
        separator: ","        # optional: csv value separator is , (default value)
        comment: "#"          # optional: csv contains comments starting with #, if empty no comment is expected (default)
        fieldsPerRecord: 0    # optional: number of fields per record, if 0 sets it to the number of fields in the first record (default)
                              # if negative, no check is made and records may have a variable number of fields
        trim: true            # optional: trim space in values and headers, default: false
The selected field's data will be masked with random values selected from a CSV file available at the specified URL (a GitHub gist in this case). The value will be chosen thanks to a hashing of the original value, allowing the output to be always the same in case of identical inputs.
See RandomChoiceInCSV for a detailed breakdown of the example configuration.
  - selector:
      jsonpath: "date"
    mask:
      randDate:
        dateMin: "1970-01-01T00:00:00Z"
        dateMax: "2020-01-01T00:00:00Z"
This example will mask the date field of the input jsonlines with a random date between dateMin and dateMax. In this case the date will be between the 1st January 1970 and the 1st January 2020.
  - selector:
      jsonpath: "last_contact"
    mask:
      duration: "-P2D"
This example will mask the last_contact field of the input jsonlines by decreasing its value by 2 days. The duration field should match the ISO 8601 standard for durations.
  - selector:
      jsonpath: "date"
    mask:
      dateParser:
        inputFormat: "2006-01-02"
        outputFormat: "01/02/06"
This example will change every date from the date field from the inputFormat to the outputFormat. The format should always display the following date : Mon Jan 2 15:04:05 -0700 MST 2006. Either field is optional and in case a field is not defined, the default format is RFC3339, which is the base format for PIMO, needed for duration mask and given by randDate mask. It is possible to use the Unix time format by specifying inputFormat: "unixEpoch" or outputFormat: "unixEpoch".
  - selector:
      jsonpath: "date"
    mask:
      randomDuration:
        min: "-P2D"
        max: "-P27D"
This example will mask the date field of the input jsonlines by decreasing its value by a random value between 2 and 27 days. The durations should match the ISO 8601 standard.
  - selector:
      jsonpath: "id"
    mask:
      incremental:
        start: 1
        increment: 1
This example will mask the id field of the input jsonlines with incremental values. The first jsonline's id will be masked by 1, the second's by 2, etc...
  - selector:
      jsonpath: "name4"
    mask:
      replacement: "name"
This example will mask the name4 field of the input jsonlines with the field name of the jsonline. This selector must be placed after the name selector to be masked with the new value and it must be placed before the name selector to be masked by the previous value.
  - selector:
      jsonpath: "mail"
    mask:
      template: "{{.surname}}.{{.name}}@gmail.com"
This example will mask the mail field of the input jsonlines respecting the given template. In the masking.yml config file, this selector must be placed after the fields contained in the template to mask with the new values and before the other fields to be masked with the old values. In the case of a nested json, the template must respect the following example :
  - selector:
      jsonpath: "user.mail"
    mask:
      template: "{{.user.surname}}.{{.user.name}}@gmail.com"
The format for the template should respect the text/template package : https://golang.org/pkg/text/template/
The template mask can format the fields used. The following example will create a mail address without accent or upper case:
  - selector:
      jsonpath: "user.mail"
    mask:
      template: "{{.surname | NoAccent | upper}}.{{.name | NoAccent | lower}}@gmail.com"
Available functions for templates come from http://masterminds.github.io/sprig/.
Most masks will be available as functions in template in the form : MaskCapitalizedMaskName.
  - selector:
      jsonpath: "mail"
    masks:
      - add: ""
- template: '{{MaskRegex "[a-z]{10}"}}.{{MaskRegex "[a-z]{10}"}}.{{MaskRandomInt 0 100}}@gmail.com' - selector:
jsonpath: "array"
mask:
template-each:
template: "{{title .value}}"
item: "value"This will affect every values in the array field. The field must be an array ({"array": ["value1", "value2"]}).
The item property is optional and defines the name of the current item in the templating string (defaults to "it"). There is another optional property index, if defined then a property with the given name will be available in the templating string (e.g. : index: "idx" can be used in template with {{.idx}}).
The format for the template should respect the text/template package : https://golang.org/pkg/text/template/
See also the Template mask for other options, all functions are applicable on template-each.
  - selector:
      jsonpath: "targetfield"
    mask:
      fromjson: "sourcefield"
This example will mask the targetfield field of the input jsonlines with the parsed JSON from field sourcefield of the jsonline. This mask changes the type of the input string (sourcefield) :
- null : nil
- string: string
- number: float64
- array: slice
- object: map
- bool: bool
  - selector:
      jsonpath: "useless-field"
    mask:
      remove: true
This field will mask the useless-field of the input jsonlines by completely deleting it.
  - selector:
      jsonpath: "newField"
    mask:
      add: "newvalue"
This example will create the field newField containing the value newvalue. This value can be a string, a number, a boolean...
The field will be created in every input jsonline that doesn't already contains this field.
Note: add can contains template strings (see the Template mask for more information).
  - selector:
      jsonpath: "newField"
    mask:
      add-transient: "newvalue"
This example will create the field newField containing the value newvalue. This value can be a string, a number, a boolean... It can also be a template.
The field will be created in every input jsonline that doesn't already contains this field, and it will be removed from the final JSONLine output.
This mask is used for temporary field that is only available to other fields during the execution.
Note: add-transient can contains template strings (see the Template mask for more information).
  - selector:
      jsonpath: "id"
    mask:
      fluxURI: "file://id.csv"
This example will create an id field in every output jsonline. The values will be the ones contained in the id.csv file in the same order as in the file. If the field already exist on the input jsonline it will be replaced and if every value of the file has already been assigned, the input jsonlines won't be modified.
  - selector:
      jsonpath: "id"
    mask:
      fromCache: "fakeId"
  caches:
    fakeId :
      unique: true
      reverse: false
This example will replace the content of id field by the matching content in the cache fakeId. Cache have to be declared in the caches section.
Cache content can be loaded from jsonfile with the --load-cache fakeId=fakeId.jsonl option or by the cache option on another field.
If no matching is found in the cache, fromCache block the current line and the next lines are processing until a matching content go into the cache.
A reverse option is available in the caches section to use the reverse cache dictionary.
  - selector:
      jsonpath: "siret"
    mask:
      ff1:
        keyFromEnv: "FF1_ENCRYPTION_KEY"
        domain: "0123456789" # all possible characters in a siret
        onError: "Invalid value = {{ .siret }}" # if set, this template will be executed on error
This example will encrypt the siret column with the private key base64-encoded in the FF1_ENCRYPTION_KEY environment variable. Use the same mask with the option decrypt: true to re-identify the unmasked value.
Characters outside of the domain can be preserved with preserve: true option.
Be sure to check the full FPE demo to get more details about this mask.
  - selector:
      jsonpath: "age"
    mask:
      range: 5
This mask will replace an integer value {"age": 27} with a range like this {"age": "[25;29]"}.
If the data structure contains arrays of object like in the example below, this mask can pipe the objects into a sub pipeline definition.
data.jsonl
{
    "organizations": [
        {
            "domain": "company.com",
            "persons": [
                {
                    "name": "leona",
                    "surname": "miller",
                    "email": ""
                },
                {
                    "name": "joe",
                    "surname": "davis",
                    "email": ""
                }
            ]
        },
        {
            "domain": "company.fr",
            "persons": [
                {
                    "name": "alain",
                    "surname": "mercier",
                    "email": ""
                },
                {
                    "name": "florian",
                    "surname": "legrand",
                    "email": ""
                }
            ]
        }
    ]
}
masking.yml
version: "1"
seed: 42
masking:
  - selector:
      # this path points to an array of persons
      jsonpath: "organizations.persons"
    mask:
      # it will be piped to the masking pipeline definition below
      pipe:
        # the parent object (a domain) will be accessible with the "_" variable name
        injectParent: "_"
        masking:
          - selector:
              jsonpath: "name"
            mask:
              # fields inside the person object can be accessed directly
              template: "{{ title .name }}"
          - selector:
              jsonpath: "surname"
            mask:
              template: "{{ title .surname }}"
          - selector:
              jsonpath: "email"
            mask:
              # the value stored inside the parent object is accessible through "_" thanks to the parent injection
              template: "{{ lower .name }}.{{ lower .surname }}@{{ ._.domain }}"
In addition to the injectParent property, this mask also provide the injectRoot property to inject the whole structure of data.
It is possible to simplify the masking.yml file by referencing an external yaml definition :
version: "1"
seed: 42
masking:
  - selector:
      jsonpath: "organizations.persons"
    mask:
      pipe:
        injectParent: "domain"
        file: "./masking-person.yml"
Be sure to check demo to get more details about this mask.
The Luhn algorithm is a simple checksum formula used to validate a variety of identification numbers.
The luhn mask can calculate the checksum for any value.
  - selector:
      jsonpath: "siret"
    mask:
      luhn: {}
In this example, the siret value will be appended with the correct checksum, to create a valid SIRET number (french business identifier).
The mask can be parametered to use a different universe of valid characters, internally using the Luhn mod N algorithm.
  - selector:
      jsonpath: "siret"
    mask:
      luhn:
universe: "abcde"Markov chains produces pseudo text based on an sample text.
sample.txt
I want a cheese burger
I need a cheese cake
masking.yml
  - selector:
      jsonpath: "comment"
    mask:
      markov:
        max-size: 20
        sample: "file://sample.txt"
        separator: " "
This example will mask the surname comment of the input jsonlines with a random value comment generated by the markov mask with an order of 2. The different possibilities generated from sample.txt will be :
I want a cheese burger
I need a cheese burger
I want a cheese cake
I need a cheese cake
The separator field defines the way the sample text will be split ("" for splitting into characters, " " for splitting into words)
This mask produce a random string by preserving character classes from the original value.
masking.yml
- selector:
    jsonpath: "id"
  mask:
    transcode:
      classes:
      - input: "0123456789abcdefABCDEF"
        output: "0123456789abcdef"
This example will mask the original id value by replacing every characters from the input class by a random character from the output class.
$ echo '{"id": "1ef619-90F"}' | pimo
{"id": "d8e203-a92"}
By default, if not specified otherwise, these classes will be used (input -> output):
- lowercase letters -> lowercase letters
- UPPERCASE LETTERS -> UPPERCASE LETTERS
- Digits -> Digits
# this configuration:
- selector:
    jsonpath: "id"
  mask:
    transcode: {}
# is equivalent to:
- selector:
    jsonpath: "id"
  mask:
    transcode:
      classes:
        - input: "abcdefghijklmnopqrstuvwxyz"
          output: "abcdefghijklmnopqrstuvwxyz"
        - input: "ABCDEFGHIJKLMNOPQRSTUVWXYZ"
          output: "ABCDEFGHIJKLMNOPQRSTUVWXYZ"
        - input: "0123456789"
output: "0123456789"This mask compares targeted values or combinations of values from a JSON Entry with values from a CSV file, inserting the matched CSV line into the designated field of the JSON entry.
{"type_1": "fire", "name": "carmender"}#,Name,Type 1,Type 2,Total,HP,Attack,Defense,Sp. Atk,Sp. Def,Speed,Generation,Legendary
1,Bulbasaur,Grass,Poison,318,45,49,49,65,65,45,1,False
...
4,Charmander,Fire,,309,39,52,43,60,50,65,1,False
...
version: "1"
masking:
  - selector:
      jsonpath: "info"
    masks:
        - add : ""                                       # add key "info" with value "" in json Entry
        - findInCSV:
            uri: "https://gist.githubusercontent.com/armgilles/194bcff35001e7eb53a2a8b441e8b2c6/raw/92200bc0a673d5ce2110aaad4544ed6c4010f687/pokemon.csv"
            exactMatch:                                  # optional: you can only use exact match or both
                csv: '{{(index . "Type 1") | lower }}'
                entry: "{{.type_1}}"
            jaccard:                                     # optional: you can only use jaccard match or both
                csv: "{{.Name | lower }}"
                entry: "{{.name |lower}}"
            expected: "at-least-one"                     # optional: only-one, at-least-one or many, by default: at-least-one
            header: true                                 # optional: csv has a header line, use it to name fields, default: false
            trim: true                                   # optional: trim space in values and headers, default: false
In this scenario, the findInCSV mask is applied to the "info" field in the JSON entry. The mask utilizes both exact matching and Jaccard similarity. The expected results passes to Jaccard similarity. The configuration expected: "at-least-one" will return the most similar CSV line which is then saved in the info field. If expected: "many" is used, Jaccard match will return all expected matched lines in order of similarity.Using expected: "only-one" result in an error if the match yields more than one line. Jaccard match offers flexibility in handling variations in the entry, such as differences in accents or letter case, by leveraging the Jaccard similarity metric.
Here is the result of excution:
{
  "type_1": "fire",
  "name": "carmender",
  "info": {
    "#": "4",
    "Name": "Charmander",
    "Type 1": "Fire",
    "Type 2": "",
    "Total": "309",
    "HP": "39",
    "Attack": "52",
    "Defense": "43",
    "Sp. Atk": "60",
    "Sp. Def": "50",
    "Speed": "65",
    "Generation": "1",
    "Legendary": "False"
  }
}This mask can generate multiple dates related to each other, for example :
version: "1"
seed: 42
masking:
  - selector:
      jsonpath: "timeline"
    masks:
      - add: ""
      - timeline:
          start:
            name: "start" # name the first point in the timeline
            value: "2006-01-02T15:04:05Z" # optional : current date if not specified
          format: "2006-01-02" # output format for the timeline
          points:
            - name: "birth"
              min: "-P80Y" # lower bound for this date ISO 8601 duration
              max: "-P18Y" # upper bound for this date ISO 8601 duration
            - name: "contract"
              from: "birth" # bounded relative to "birth" (if not specified, then relative to start point)
              min: "+P18Y"
              max: "+P40Y"
            - name: "promotion"
              from: "contract"
              min: "+P0"
              max: "+P5Y"
Will generate :
$ pimo --empty-input
{"timeline":{"start":"2006-01-02","birth":"1980-12-01","contract":"2010-07-16","promotion":"2010-12-06"}}before and after constraints can be set to create better timelines, for example :
            - name: "begin"
              min: "P0"
              max: "+P80Y"
            - name: "end"
              min: "P0"
              max: "+P80Y"
              constraints:
                - before: "begin"
The dates begin and end will both be chosen from the same interval, but end will always be after begin.
To enforce this, the timeline mask will regerate all date until all constraints are met, up to 200 retries. If there is still unsatified contraints after 200 attempts, the mask will set the date to null.
This default behavior can be changed with the following parameters :
-
retrysets the maximum number of retry (it can be set to0to disable retrying)- timeline: start: name: "start" value: "2006-01-02T15:04:05Z" format: "2006-01-02" retry: 0 # constraints will fail immediatly if not satisfied
-
onErrorwill change the default behavior that set date tonullif contraints cannot be satified, following values are accepted :default: use a default value, this is the standard behavior whenonErroris unset (see next item for how to change the default value)reject: fail masking of the current line with an error
onErroris defined on each constraint, for example :- name: "begin" min: "P0" max: "+P80Y" - name: "end" min: "P0" max: "+P80Y" constraints: - before: "begin" onError: "reject"
-
defaultset the default value to use when an error occurs, if not setnullvalue is the default- name: "begin" min: "P0" max: "+P80Y" - name: "end" min: "P0" max: "+P80Y" constraints: - after: "begin" default: "begin" # use begin date if constraint can't be satisfied
The epsilon parameter is the minimum period of time between two date to validate a constraint.
It can be set globally on the timeline to make sure dates under constraints have a minimum amount of time between them.
            - timeline:
                start:
                  name: "today"
                  value: "2006-01-02T15:04:05Z"
                format: "2006-01-02"
                retry: 0
                epsilon: "P1Y" # minimum 1 year between dates (in constraints)
For example this contraint will fail if begin is 2007-12-20 and end is 2008-05-21 (less than a year between dates).
            - name: "end"
              min: "P0"
              max: "+P80Y"
              constraints:
                - after: "begin"
It can be set locally on a single constraint (override global epsilon parameter).
                    constraints:
                      - after: "contract"
epsilon: "P0" # will override global epsilon configThe XML mask feature enhances PIMO's capabilities by enabling users to manipulate XML content within JSON values. The proposed syntax aims to align with existing masking conventions for ease of use.
Input JSON
{
    "title": "my blog note",
    "content": "<note author='John Doe'><date>10/10/2023</date>This is a note of my blog....</note>"
}
masking.yml
version: "1"
masking:
  - selector:
      jsonpath: "content"
    mask:
      xml:
        xpath: "note"
        # the parent object (a domain) will be accessible with the "_" variable name.
        injectParent: "_"
        masking:
        - selector:
            jsonpath: "@author"
          mask:
            # To use a parent value in template: {{. + injectParentName + . + jsonKey}}
            template: "{{._.title}}"
        - selector:
            jsonpath: "date"
          masks:
            - randDate:
                dateMin: "1970-01-01T00:00:00Z"
                dateMax: "2020-01-01T00:00:00Z"
            - template: "{{index . \"date\"}}"
This example masks the original attribute value with the specified template value. jsonpath: "content" point to the key in json that contains target XML content to be masked. The masking section applies all masks to the target attribute or tag in XML.
the parent object (a domain) will be accessible with the "_" variable name.
To use a parent value in template: {{. + injectParentName + . + jsonKey}}
For more infomation on pasing XML files. refer to Parsing-XML-files
Output JSON
{
  "title": "my blog note",
  "content": "<note author='my blog note'><date>2008-06-07 04:34:17 +0000 UTC</date>This is a note of my blog....</note>"
}To use PIMO to masking data in an XML file, use in the following way :
cat data.xml | pimo xml --subscriber parentTagName=MaskName.yml > maskedData.xmlPimo selects specific tags within a predefined parent tag to replace the text and store the entire data in a new XML file. These specific tags should not contain any other nested tags.
To mask values of attributes, follow the rules to define your choice in jsonpath in masking.yml.
- For attributes of parent tag, we use:
@attributeNamein jsonpath. - For attributes of child tag, we use:
childTagName@attributeNamein jsonpath.
For example, consider an XML file named data.xml:
data.xml
<?xml version="1.0" encoding="UTF-8"?>
<taxes>
    <agency>
        <name>NewYork Agency</name>
        <agency_number>0032</agency_number>
    </agency>
    <account type="classic">
        <name age="25">Doe</name>
        <account_number>12345</account_number>
        <annual_income>50000</annual_income>
    </account>
    <account type="saving">
        <name age="50">Smith</name>
        <account_number>67890</account_number>
        <annual_income>60000</annual_income>
    </account>
</taxes>
In this example, you can mask the values of agency_number in the agency tag and the values of name and account_number in the account tag using the following command:
cat data.xml | pimo xml --subscriber agency=masking_agency.yml --subscriber account=masking_account.yml > maskedData.xmlmasking_agency.yml
version: "1"
seed: 42

masking:
  - selector:
      jsonpath: "agency_number"  # this is the name of tag that will be masked
    mask:
      template: '{{MaskRegex "[0-9]{4}$"}}'
masking_account.yml
version: "1"
seed: 42

masking:
  - selector:
      jsonpath: "name" # this is the name of tag that will be masked
    mask:
      randomChoiceInUri: "pimo://nameFR"
  - selector:
      jsonpath: "@type" # this is the name of parent tag's attribute that will be masked
    mask:
        randomChoice:
         - "classic"
         - "saving"
         - "securitie"
  - selector:
      jsonpath: "account_number" # this is the name of tag that will be masked
    masks:
      - incremental:
          start: 1
          increment: 1
        # incremental will change string to int, need to use template to restore string value in xml file
      - template: "{{.account_number}}"
  - selector:
      jsonpath: "name@age" # this is the name of child tag's attribute that will be masked
    masks:
      - randomInt:
         min: 18
         max: 95
         # @ is not accepted by GO, so there we need use index in template to change int into string
      - template: "{{index . \"name@age\"}}"
After executing the command with the correct configuration, here is the expected result in the file maskedData.xml:
maskedData.xml
<?xml version="1.0" encoding="UTF-8"?>
<taxes>
    <agency>
        <name>NewYork Agency</name>
        <agency_number>2308</agency_number>
    </agency>
    <account type="saving">
        <name age="33">Rolande</name>
        <account_number>1</account_number>
        <annual_income>50000</annual_income>
    </account>
    <account type="saving">
        <name age="47">Matéo</name>
        <account_number>2</account_number>
        <annual_income>60000</annual_income>
    </account>
</taxes>Pimo embed a usefule list of fake data. URIs that begin with a pimo:// sheme point to the pseudo files bellow.
| name | description |
|---|---|
nameEN |
english female or male names |
nameENF |
english female names |
nameENM |
english male names |
nameFR |
french female or male names |
nameFRF |
french female names |
nameFRM |
french male names |
surnameFR |
french surnames |
townFR |
french towns names |
The content of built-in lists are in the maskingdata package
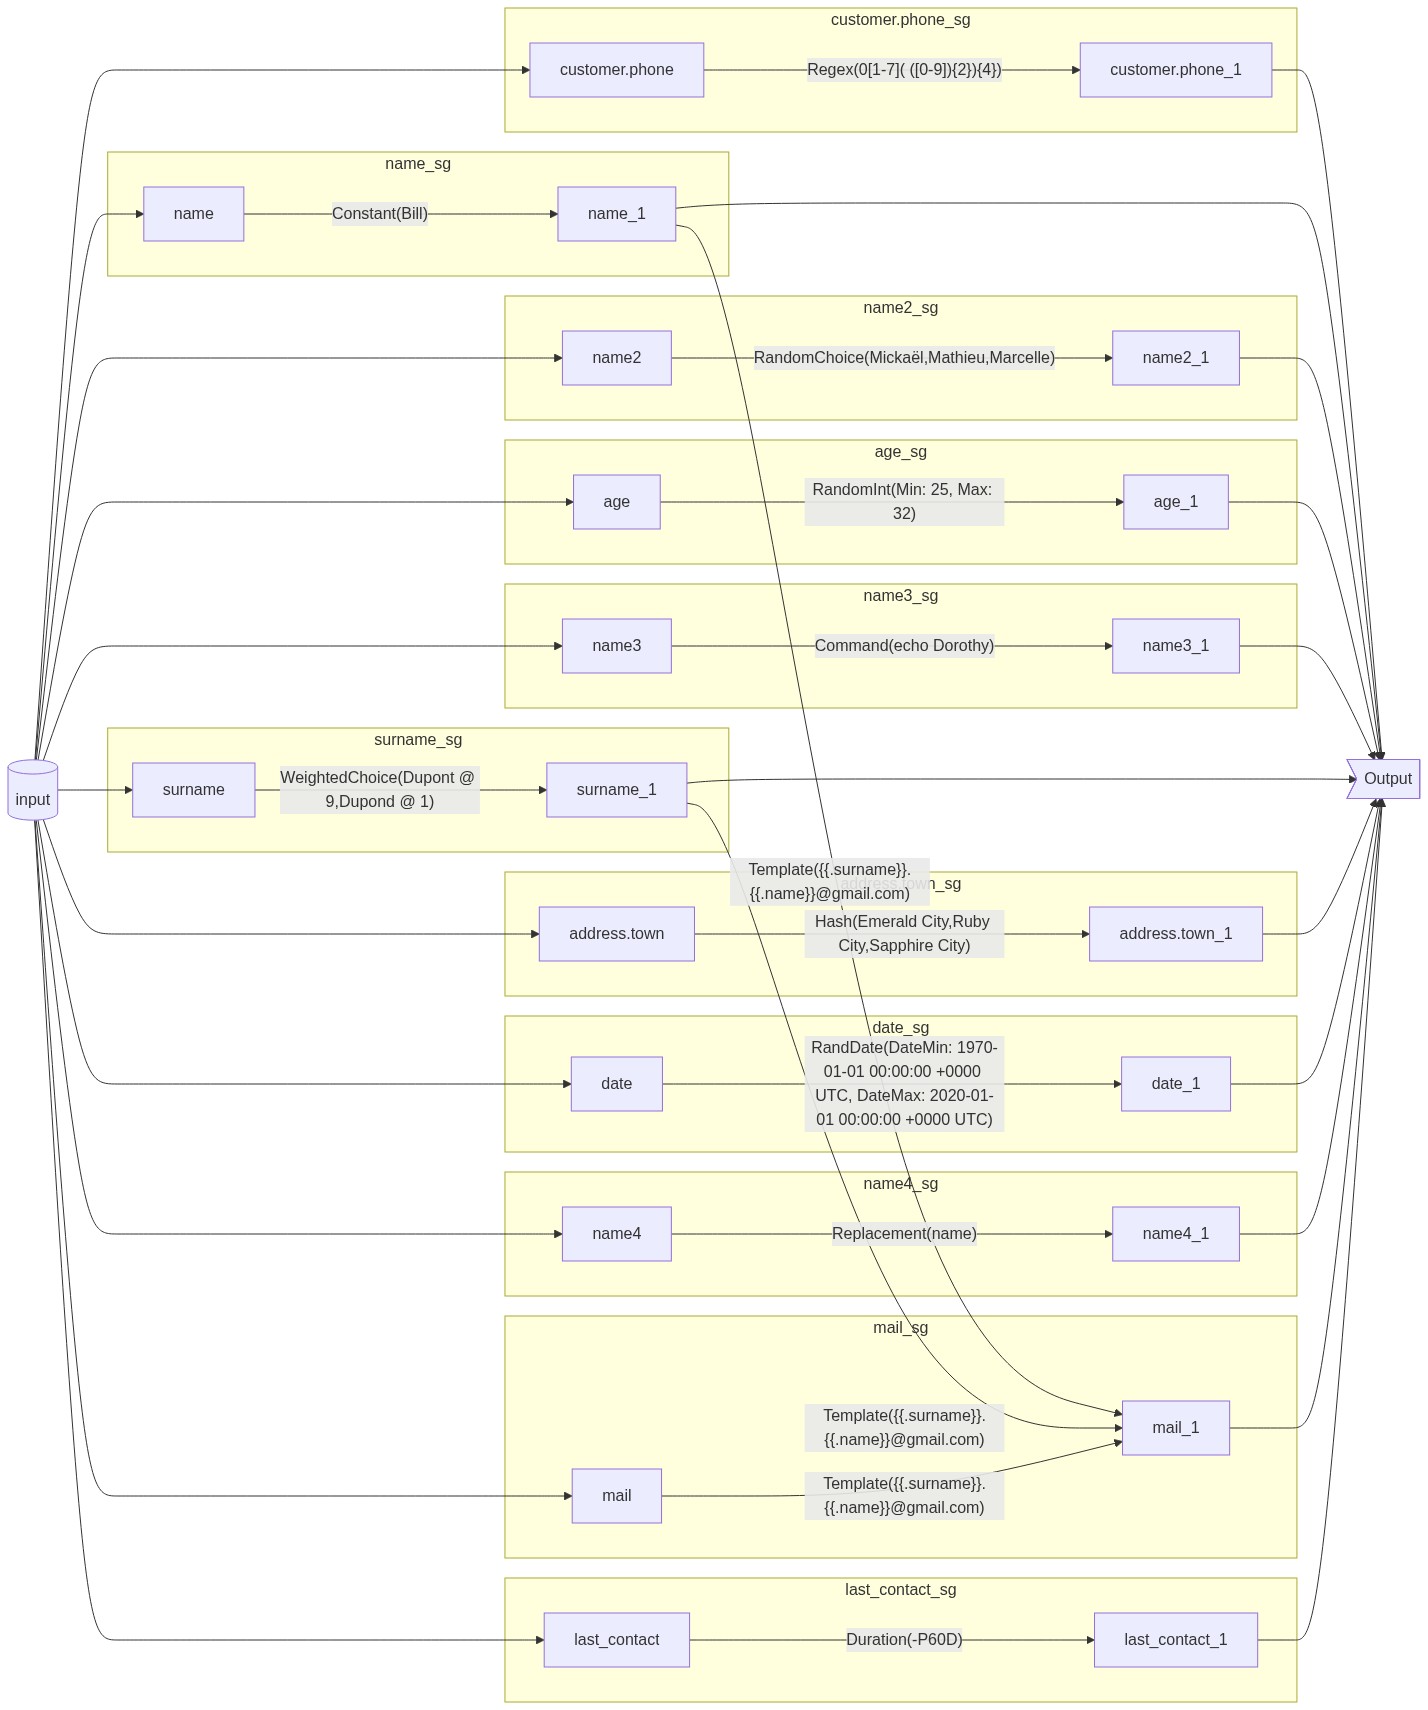
PIMO can generate a Mermaid syntax flow chart to visualize the transformation process.
for example the command pimo flow masking.yml > masing.mmd with that masking.yml file generate following chart :
To integrate with Visual Studio Code (opens new window), download the YAML extension.
Then, edit your Visual Studio Code settings yaml.schemas to containing the following configuration:
{
  "yaml.schemas": {
    "https://raw.githubusercontent.com/CGI-FR/PIMO/main/schema/v1/pimo.schema.json": "/**/*masking*.yml"
  }
}
Using this configuration, the schema will be applied on every YAML file containing the word `masking`` in their name.
- CGI France ✉Contact support
- Pole Emploi
Copyright (C) 2021 CGI France
PIMO is free software: you can redistribute it and/or modify it under the terms of the GNU General Public License as published by the Free Software Foundation, either version 3 of the License, or (at your option) any later version.
PIMO is distributed in the hope that it will be useful, but WITHOUT ANY WARRANTY; without even the implied warranty of MERCHANTABILITY or FITNESS FOR A PARTICULAR PURPOSE. See the GNU General Public License for more details.
You should have received a copy of the GNU General Public License along with PIMO. If not, see http://www.gnu.org/licenses/.